Showing posts with label hobby. Show all posts

Friday, September 21, 2012

Loom Knit Decorative Ball or Ornament for the Holiday

Hi friends!

I have a fun & quick Holiday project to start, loom knit with jingle bell balls inside for you!!!

Use your scrap funky yarn for this and start churning them out!! :-) My idea for these fun decorative balls were to use them as ornaments, in a cluster hanging from a door knob or wreath in a bowl in holiday or non holiday colors, or any other cool idea you can come up with!

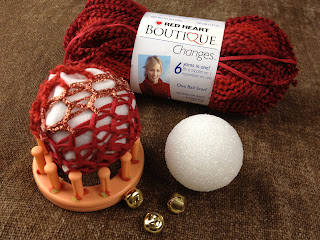
Watch the VIDEO below,  Here are your supplies pictured below:
  • Knifty Knitter or Boye 12 peg bloom loom or other 12 peg large gauge loom.
  • scrap yarn with sparkle or other funky or special yarn you like
  • 2 1/2" syrofoam ball or plain ornament ball about 2 1/2 "- 3"
  • jingle bells (optional)
  • felt or scrap contrasting color fabric to your yarn choice (covers ball inside)
  • scissors & something blunt to poke & scoop the styrofoam (can just use kid safety scissors)
  • loom knitting tool & crochet hook


Use a 12 peg bloom loom. Give as gifts or tie to a wrapped packages as well.  Instead of styrofoam balls that I show with jingle bells inside, you can put these around your plain existing ornament balls as well.  As a bonus i included my gift bow tutorial below it if you'd like to add a bow at the base of these balls or in a cluster on a door.  (Learn How to Make a Bow)  Have fun!....Here is the LOOM ALONG Video!


 http://www.youtube.com/watch?v=yWy5K8YbWbY

Need MORE?  Watch how to Wrap a Package!..yup I'm whipping these out!  LOL!  Have fun everyone.


Kristen Mangus
GoodKnitKisses
http://www.goodknitkisses.com
http://www.facebook.com/groups/loomknitclub (JOIN US and Post your Pictures! :-)
http:/www.youtube.com/goodknitkisses

Wednesday, June 22, 2011

Pattern and Video Tutorial: Loom Knit Mesh Bag


Loom Knit Mesh Bag by Kristen at GoodKnit Kisses


41 peg (or new 40 peg in pink) Knifty Knitter Extra Large Round Loom - Yellow

3 pegs of Spool Loom

Skill Level: Beginner, level up

Uses: Personal size Mesh bag for the beach or shopping.  Fits 6 foot rolled up towel, swimsuit, sandals, water & sunscreen.

Yarn:   1 ball nylon crochet thread 90-100 yards

            1 ball cotton 90-100 yards

*or 2 balls of cotton

(Watch http://www.youtube.com/goodknitkisses for video tutorials on this bag design)

Abbreviations:             EW = E-wrap                         P = Purl


Flat Panel-
1.     Using both strands of yarn E-wrap Cast on 14 stitches to round 41 peg Knifty Knitter loom (or new 40 peg loom). Counter-clockwise to the starter peg, work as a flat panel in ew 30 rows making sure your working yarn is back to the starter peg for the next row.

Building Base bag –
2.     Leaving the panel on the loom, stretch the panel across the loom to the opposite side and place on pegs across. Now take the side stitches and place 2 stitch loops at a time on adjacent pegs to stretch flat panel to fit on all pegs of the loom. Make sure to pick up ALL side stitches so your bag will not have an open hole. This is the bottom base of the bag. Wrap all pegs ew in a full circle and knit over leaving only 1 set of two strands (the two color choices). For example the side stitches had 3 sets of two before knitting over.

Main body of the Bag –
3.     P 1 row.
4.     EW 1 row.
5.     P 1 row.
6.     EW 8 rows.
7.     P 1 row.
8.     EW 5 rows.
9.     P 1 row.
10. EW 5 rows.
11. P 1 row.
12. EW 5 rows.
13. P 1 row.
14. EW 2 rows.
15. Basic bind off loosely as to not over tighten opening of bag.

Handle for mesh Bag –
Spool loom. 2 strands 1.5 times diameter of yellow loom or 52.5-54.5" long depending on material.


Weave the icord into the top of the bag between the knit stitch columns. Row to start the weaving. Look at the top of the bag. Weave between the two top purl rows. I started mine just above the bottom purl row (it's the 2nd to last purl row you completed). Connect the ends by tying together and weaving in the rest. Feed access handle material equally on opposite sides to pull outward, making it look like two handles. See picture. Pull both handles to drawstring close and look like a purse or pull all of one handle to make as a shoulder strap! Weave in all loose strands.

©2011 GoodKnit Kisses

Tuesday, February 22, 2011

Up in Stitches!!

Getting started on the loom? START HERE for your first cast on and stitch technique.

First Loom Stitch: E wrap or Single Stitch

When you first pick up a loom, the instruction book usually teaches you ONE stitch.  It is called the Ewrap or in regular knitting also called the single stitch. These stitches are abbreviated as ew or ss respectively.  The Ewrap makes a stockinette type stitch.  This type usually curls on you. Lets say you make a hat. If you don't make a brim from the instructions (or pattern) then the end of the hat will curl.  You can solve this by learning new stitches to start a project in and then continue in the ewrap for the remainder.  Many times I will start with a garter stitch as my brim and then ewrap.  BTW a hat is the quickest beginner project.  It works up fast and tells you you're doing well.  Be sure to pick up a Bulky #5 yarn for your first project or 2 skeins of worsted yarn in a #3 or #4 to use together at the same time.

The ewrap simply wraps the peg in a lower case "e" fashion where it crosses on the inside of the loom.  Check out this beginners tutorial below to see it and hear some tips along the way.  As always..I'm a goof.

(Stay tuned fairly quickly for I will show you both the knit (k) and purl (p) stitches to make the garter stitch pattern.)

Have fun! Be sure to come back and tell me what you've made and your progress! Happy Looming!!

How to Loom Knit: Beginner E wrap (ew) Stitch

© 2011 GoodKnit Kisses

Friday, February 18, 2011

AllFreeKnitting

Hi everyone!!
I have a few exciting announcements and TWO great tutorial videos are below:

I'm super pleased to announce I am now working along side of AllFreeKnitting.com to bring you the latest in Loom Knitting Tutorials on my YouTube Site and on AllFreeKnitting's site as well! A very big thanks to Mikey at mikeyssmail & The Crochet Crowd for hooking me up!

I am also happy to announce I have purchased my website but until I can get enough funding, through partnering with YouTube it will be delayed getting up and running.  WILL YOU HELP ME??? Please subscribe to my channel at goodknitkisses and pass the word to your friends.  You can opt to get an email every time I make a video or leave the box blank.  MY GOAL IS 800 SUBSCRIBERS!  Please help me get there :-)  For my videos to remain free, this will really go a long way. Thanks inadvance for your help.

My Publisher has approved of the following videos.  These are the first in the line and I have decided to start at the basics for beginners or traditional knitters who want to try their hand at learning.  Check out Part 1 for an introduction on looms and Part 2 for yarn selections and project ideas. Again, loom knitting is fun even for grade-schoolers.  SO grab a loom and get started today! Happy Looming!


DID THIS HELP YOU? Please comment below.  I'd love to hear from YOU!

Thursday, February 3, 2011

Loom Knit: NEW Triple Rib Stitch Revealed

OMG I'm soooo excited! I did a totally original loom video!!! My YouTube - Please subscribe!

This stitch is usually done on needles only and I've never seen it on a loom...until Now! Yay!  


Have fun, Thanks for watching and Happy Looming!!
©2011 GoodKnit Kisses

Wednesday, February 2, 2011

Rectangle Loom: Casting Off & Finish Loose Beginning End of Panel

Hi loom fans!

Today I've uploaded two new videos to my YouTube Site!

One video shows casting off the rectangular loom from a Twisted Knit Stitch or Single Rib Stitch.

The next video does something I've never found by using Google or searching videos on YouTube.  When I first learned to loom knit I figured out how to cast off or bind off my project from the loom but the starting end or side (beginning part you first cast on) always loosed "looser" than the final side.  If you crochet then it doesn't bother you.  You are probably finishing that end or adding a crochet border around he whole piece.  I didn't know how to make this EASIER so I made up my own.  The benefit was no extra yarn was needed!!  This is great if you ran out of that yarn after making a long scarf or panel.  It's also very quick!  I hope this helps you on your next project.  PLEASE come back and comment or let me know on my YouTube channel.  I'd love to hear from you.  Here is the video...thanks for tuning in and Happy Looming!! ©2011 GoodKnit Kisses


Don't forget to subscribe to my YouTube channel for ALL new videos.  I may not always blog about them :-)

Friday, January 28, 2011

How To Loom Knit the Twisted Knit Stitch

Hello Looming friends!

I've uploaded my first tutorial.  The video will be included below or you can catch it and new videos by subscribing to my YouTube channel.  Just click subscribe and check the box to email you.  You'll be emailed when I upload videos.

This first video is my first attempt and I'm working out the kinks.  Thank you for your graciousness as I may fumble...don't we all? :-)

WHAT YOU'LL SEE: 
Quick Introduction to different Loom Types (showing some I have in the background)

Using Long green loom (rectangle)
Making a home made Styler (for quick setup of yarns on pegs)
We'll Cast On using two strands. (Note for beginners-This is how you put the yarn on at first to get started)
Cast On Method - Twisted Knit Stitch
Main Stitch Method/Pattern - Twisted Knit Stitch

WHAT YARN IS USED:
2 strands of #3 or 4 yarn in two different colors. 
(Just a standard crafting acrylic yarn.  You can use wool, cotton or acrylic.  This is just what I used.)

DIFFICULTY LEVEL:
Beginner - This video I go a bit slow.  if you are new to loom knitting this is a great video for you.

IDEAS FOR THIS STITCH:
This stitch is great for scarves, lovey, blankets, placemats, pot holders (in cotton!) and a number of other projects you can build from panels.

Twisted Knit Stitch


Please come back and tell me what you made from this stitch.  I'd love to hear from YOU!

Have fun everyone, Happy Looming!!

Search This Blog

My Blog List